|
A Raspberry Pi Sitting On A Low-Cost Moving Robot
Computational Thinking for Everyone
Robots consists of hardware (actuators and sensors) connected to a processing unit (normally some kind of general purpose or dedicated microcontroller). The controller is part of the whole system, therefore a robot is an embedded system. The program of the microcontroller is solely responsible to make the robot perform its tasks. As a consequence robotics development consists of mechanical and electronic engineering and programming. Since such systems are nowadays everywhere in our life and everyone has constantly to deal with such systems, fundamental knowledge of computer programming willl help in many situations, even if only few persons write computer programs for robots professionally. It is now widely accepted in our industrialised society that computational thinking enables people to better face the challenge of the everydays life. This also legitimates the request for computer programming courses in the curriculum of elementary schools.
Robotics to Motivate Programming
Learning programming with robots is very motivating. It is like game programming, but the actor is real and may present human aspects of movement and reaction. To maintain the interest and make the effort worthwhile, it is better you owe your personal robot. To build your own robot, take one of the a well-known microcontroller system like Arduino or Raspberry Pi and attach some cheap external devices like light sources (LEDs), switches, motors and infrared detecting sensors. Then it is time to write a program to make the robot perform some useful tasks like following a road as a self-driving car. Like many people around the world, your choice is to use the programming language C for the Arduino and Python for the Raspberry Pi. Since plain C is a low-level programming language, it is quite hard to develop programs in C. With C you are easily misguided to adopt a bad programming style and write unstructured code. It may work, but you may also spend hours of finding a stupid programming fault. To avoid this frustration and because it is our mission to teach how to solve computer problem elegantly, we prefer to adopt modern programming paradigms like structured and object-oriented-programming observing a good programming style.
Robotics Programming with the Raspberry Pi
The Raspberry Pi is by far the best choice to reach these goals. Not only it is cheap and used by a huge fan community, but it also runs a full-fledge operating system, a flavor of Linux. As such, any common programming languages including Linux script programming is available. By far the most widespread language for the Raspberry Pi is Python, a simple scripting language that supports almost all features of a modern and advanced general purpose programming language. But because Java is the language of choice in many introductory and advanced programming courses all over the world, we also support Java in parallel to Python for our robotics projects.
Support for Any Programming Language
If neither Java nor Python is of interest to you, do not stop reading. We present a sophisticated TCP/IP socket server (BrickGate) running on the Raspberry Pi that let you access all of the robot hardware by connecting as TCP/IP client and exchanging simple dot separated text commands (not codes). To make a motor rotate in one direction, just send "mot.forward", to make it run in the other direction "mot.backward" and to get the value of a light sensor, just send "ls.getValue". So any programming language that supports socket programming can be used.
Library Shields from Low-Level Code
Depending on your interests and programming skills, you may program the robot in Java or Python using low-level libraries for accessing the specific hardware based on the Raspberry Pi GPIO port like the Pi4J Java library or the RPI.GPIO Python module. For beginners this way is a rather steep and may be frustrating, because much code and knowledge is needed for the most elemantary robot action, for example to make a DC motor rotate using a pulse-width modulation chip (PWM) connected via I2C. With RaspiBrick you get a rich robotics library that shields you from the underlying low-level details. The library source is public, so nothing is hidden to you and by studying the library code you learn how to write professional robotics programs with a modern modular design.
Extremely Simple Programs: An Example
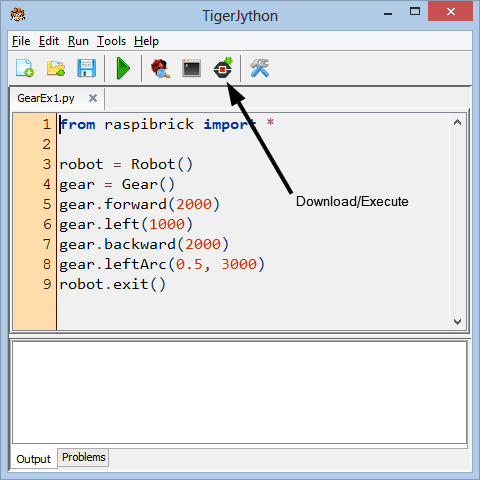
To show you how it works, lets assume you want to move the robot by rotating both motors. The Python script becomes extremely simple, because the two motors are modelled by an object called a Gear. In our view it is important to teach fundamental concepts right from the beginning. It is our decision not to use global function calls but software objects like a Robot, a Gear, a LightSensor, etc. and to call functions (methods) of these objects. We never encountered difficuties with programmer novices by teaching robotics in a object oriented way, because we only use objects, but do not construct classes until late in the curriculum.
The program in the left section below is executed either locally on the brick (autonomous mode) using the Python 2.7 interpreter of the Raspberry Pi, but exactly the same program may also be executed on a remote PC that sends commands to the Raspberry Pi via our TCP/IP socket server. Brickgate interprets the commands, communicates with the robots hardware and sends back sensor results.
Moreover a full-featured RaspiBrick simulation application is available (written in Java using the JGameGrid game library). By merely changing the import, the same program runs in software only, without the real hardware. Simulation is not only useful to test your programs and algorithms, but
is essential in the classroom where not every student owns a robot.
from raspibrick import *

robot = Robot()
gear = Gear()
gear.forward(2000)
gear.left(1000)
gear.backward(2000)
gear.leftArc(0.5, 3000)
robot.exit()
|
from raspisim import *

robot = Robot()
gear = Gear()
gear.forward(2000)
gear.left(1000)
gear.backward(2000)
gear.leftArc(0.5, 3000)
robot.exit()
|
|
Real mode (remote or autonomous)
| Simulation mode (in TigerJython) |
The same program in Java is a bit more complicated due to the class construction, but the essential part concerning the robot remains the same.
import ch.aplu.raspisim.*;
public class GearEx1
{
public GearEx1()
{
Robot robot = new Robot();
Gear gear = new Gear();
gear.forward(2000);
gear.left(1000);
gear.backward(2000);
gear.leftArc(0.5, 3000);
robot.exit();
}
public static void main(String[] args)
{
new GearEx1();
}
} |
Execute the program locally using WebStart
Another programming paradigm is of great importance: Software entities do not only respond to commands by calling functions (methods), but change their current state and thus possess a kind of memory (attributes). In the very first lesson it becomes evident what we mean by this: When we call gear.forward() (with no parameter) the function call returns immediately, but the gear is now moving forward, thus the gear has changed its state.
Smooth Integration in TigerJython Python IDE
The RaspiBrick Python modules are fully integrated in the TigerJython Python IDE and the download to the Raspberry Pi brick is done
by a single click. By pressing the pushbutton on the RaspiBrick the autonomous Python script can be executed any time without the need of an external PC or an attached screen/keyboard.
Summary of our RaspiBrick Robotics Deutsch
- Completely preconfigured Linux-based firmware with all additional components as SD-card image download
- Alternative: Simple and well-documented manual installation starting from the Raspberry Pi NOOBS distribution
- Support of the Pi2Go hardware, but easily adaptable to other robotics hardware based on the Raspberry Pi
- Connection over TCP/IP. Setup-Tool to select SSID and password of the IP hotspot without screen/keyboard connected to the Raspberry Pi
- Fully automated firmware update from GitHub repository
- Preinstalled VNC server for remote desktop
- Extensive class-based robotics library with similar design as for the Lego NXT/EV3 robotics
- Support of autonomous, remote and simulation mode in Python and Java
- Integration of all modes in the Python IDE TigerJython, without the need to connect a screen/keyboard
- Preinstalled Java IDE BlueJ and RaspiTransfer tool for the development of Java based robotics programs
- IP socket server (ported from BrickGate) to execute remote programs in any programming language (like former NXT direct mode)
- Autostart of the firmware to execute autonomous programs and shutdown the processor without an attached screen/keyboard
- All library sources and install scripts available from GitHub (http://github.com/raspibrick)
- Online tutorials
- Collection of application examples continuously updated
- Online support in English, French and German (support@raspibrick.com)
Appendix 1:
RaspiBrick Firmware: State selection and LED/display information
|
State
|
Switch on
|
Search Access Point (AP)
|
AP found
|
AP not found
|
Ready
|
BrickGate server is running and waits for a client
|
BrickGate server connection established
|
|
Display
(if installed)
|
empty
|
AP--
|
Ticker:
shows IP
|
Ticker:
#0-0-0-0
|
m-n
m: selected program id
n: number of programs
|
HOLd
|
Conn for a short while, then empty (free for user program)
|
|
LEDs
(near pushbutton)
|
off
|
white
|
green
|
yellow
|
blue, blicking selected program id
|
green blinking
|
off
(free for user program)
|
|
Possible Actions
|
Wait |
Cancel
by a click
|
Cancel
by a click
|
Cancel by a click
|
Click starts selected Python program, double-click selects current program, long press starts BrickGate server, long press with front IRS active starts shutdown, click with right IRS active shows IP,
double-click with front IRS active deletes all programs
|
Click starts autonomous Java program, long press stops BrickGate server
|
free for user program
|
Appendix 2: Shutdown
|
State
|
IdLE
|
Shutdown "Are you sure?"
|
Shutdown confirmed
|
Shutdown canceled
|
|
Display
|
m-n
|
oooo
|
BYE.
|
IdLE
|
|
LEDs
|
blue
|
red
|
off, then faint red
|
blue
|
|
Possible Actions
|
Long press and front IR sensor activated
|
Confirm: Click and front IR sensor activated
Cancel: Click with non-activated sensor
|
Wait until Raspberry Pi's green LED stops blinking. Then switch-off
|
Normal use
|
|
 LinkUp
 TCPCom
 Simulations