| |
Python is one of the best programming language to introduce into programming, to acquire basic concepts of computer science and to train a good programming style that can be reused in other domains. But Python is not particularly well adapted for developing embedded systems, because it is an interpreted language and as such needs an interpreter to run the code. But because the Raspberry Pi is a full computing system running Linux, there is no problem to run robotics scripts interpreted by the preinstalled Python interpreter. Because it is our aim not only to write robotics programs that work but also to acquire a good programming style, we prefer Python to other common microprocessor development languages.
Python Robotics with SSH or VNC
With a terminal (console) connection to the Raspberry Pi you can edit a Python script using any of the available text based editors. For beginners we recommend to use LEAFPAD, NANO or IDLE. With little additional installation effort, EMACS is available too. To run the script you should first stop all running Python programs, especially the RaspiBrick firmware, by calling rkill. Then you start your script by invoking
sudo python <script.py>
If you use our raspibrick module with from raspibrick import * you start your script by invoking
pyrun <script.py>
This automatically includes the raspibrick module library in the Python path and runs Python as sudo.
This mode of operation is especially useful for small scripts to test your hardware that needs direct access to the GPIO ports. If this is your standard mode of operation, it is easy to modify the Linux autostart shell script autostart.sh in the directory /home/pi/raspibrick so that the RaspiBrick firmware (ProcessMon.py) is not started at all or automatically terminated after the IP is displayed.
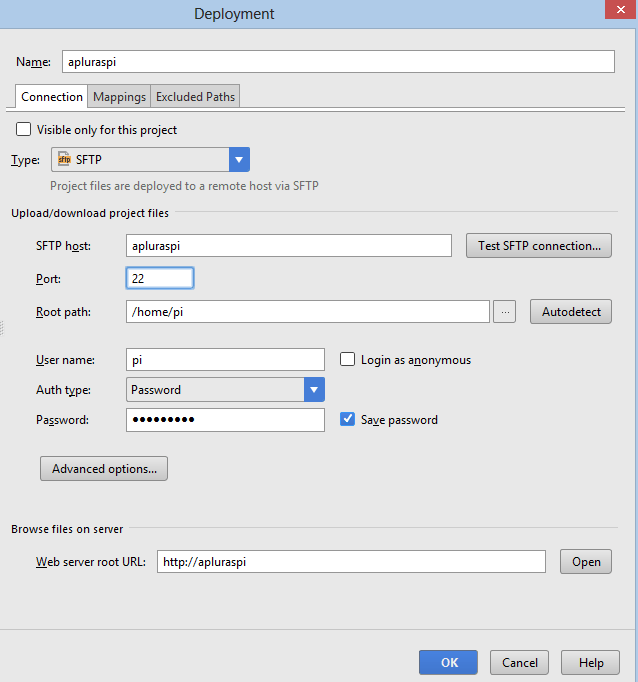
With a VNC connection you can use a GUI based editor/Python IDE. The classical IDLE is somewhat outdated but still an option. A full-fledged IDE like PyCharm is difficult to install on the brick and a heavy burden for the narrow-chested Raspberry Pi. But PyCharm (professional version) may run remotely and execute the Python script transparently on the Raspberry Pi via SSH. Login as pi with password raspberry and select /home/pi as Root path.
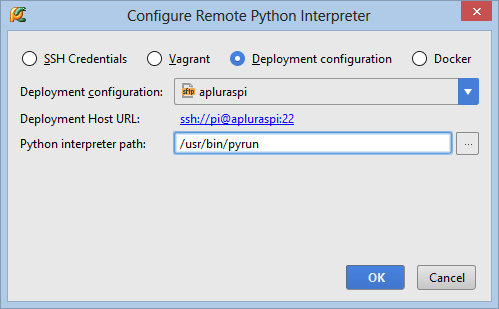
To run the Python interpreter on the Raspberry Pi with sudo privileges, select pyrun as remote command.
This is our preferred mode to develop Python programs on the Raspberry Pi.
Python Robotics with TigerJython
TigerJython is a Python development environment specially designed for programmer novices. But it is much more than a simple code editor or IDLE-like application. When started, its look-and-feel is like one of the professional programming tools like Eclipse, Visual Studio or Netbeans. TigerJython presents a panoply of education oriented modules and class libraries without any additional installation. The support for RaspiBrick robotics is smoothly integrated for the remote, autonomous and also the simulation mode. Like for professionals, robot applications can first be developed in simulation mode and by only changing a single line, the import statement, run with the real robot. This is possible, because the programming API for the simulation, remote und autonomous modes is identical, though the underlying implementations differ completely.
 |
|
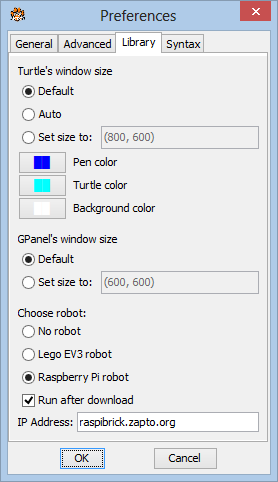
Robotics Preferences
|
|
TigerJython IDE
|
|
|
As example we present the classical line follower robot. It is recommended that you download TigerJython to your PC (Windows, Mac, Linux), so you can execute the examples in simulation or real robot mode.
For the real robot, the track is normally created with colored paper. In simulation mode you create a track by loading a background image. Some of them are immediately available in TigerJython's sprites folder. Here the robot environment is called the context and you design it by calling methods of the RobotContext class. (To simplify the change from simulation to real mode, the RobotContext class is implemented with empty methods in the real robot libraries. So there is no need to remove the RobotContext lines or to comment them out when the program is run on the real robot,)
from raspisim import *
#from raspibrick import *

RobotContext.useBackground("sprites/track.gif")

robot = Robot()
gear = Gear()
gear.setSpeed(20)
irR = InfraredSensor(IR_LINE_RIGHT)
irL = InfraredSensor(IR_LINE_LEFT)
gear.forward()

while not isEscapeHit():
    vR = irR.getValue()
    vL = irL.getValue()
    if vR == 0 and vL == 0:
        gear.forward()
    elif vR == 1 and vL == 0:
        gear.leftArc(0.06)
    elif vR == 0 and vL == 1:
        gear.rightArc(0.06)
robot.exit()
|
|
|
Python Code
| RobotContext |
Execute the simulation program locally using WebStart
The program is self-explaining: The values 0 and 1 of the infrared sensors pointing to the floor (reflected infrared light intensity below or above a threshold) determine if the robot moves straight forward or on a left or right arc. In remote and simulation mode, the Escape buttons corresponds to the Escape keyboard key. In autonomous mode, it is the RaspiBrick pushbutton. As you see, you are completely isolated from the low-level code to rotate motors and read infrared sensor values or GPIO port states.
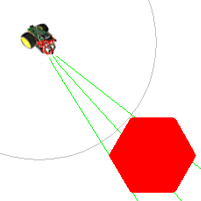
The next example shows the use of the ultrasonic sensor to work like a radar system to find a target and move the robot close to it.
from raspisim import *
#from raspibrick import *

mesh = [[50, 0], [25, 43],
        [-25, 43], [-50, 0],
        [-25, -43], [25, -43]]
RobotContext.useTarget("sprites/redtarget.gif",
        mesh, 400, 400)

def searchTarget():
    step = 0
    left = 0
    right = 0
    while not isEscapeHit():
        gear.right(50)
        step = step + 1
        dist = us.getDistance()
        if left == 0: # search left
            if dist != -1:
                left = step
        elif right == 0:  # search right
            if dist == -1:
                right = step
                break
    return left, right

robot = Robot()
gear = Gear()
us = UltrasonicSensor()
us.setBeamAreaColor(Color.green)
us.setProximityCircleColor(Color.lightGray)
gear.setSpeed(10)
left, right = searchTarget()
gear.left((right - left) * 25)
gear.forward()

while not isEscapeHit():
    dist = us.getDistance()
    if dist <= 20:
        break
robot.exit()
|
|
|
Python Code
| RobotContext |
Execute the simulation program locally using WebStart
Collection of Examples:
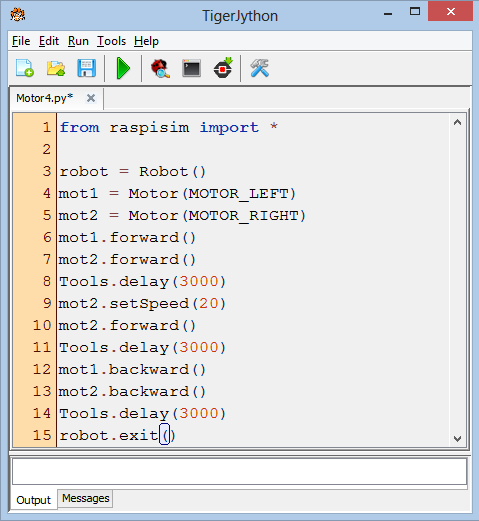
Motor:
from raspisim import *
#from raspibrick import *

robot = Robot()
motL = Motor(MOTOR_LEFT)
motR = Motor(MOTOR_RIGHT)

motL.forward()
motR.forward()

Tools.delay(2000)
robot.exit()
| from raspisim import *
#from raspibrick import *
robot = Robot()
motL = Motor(MOTOR_LEFT)
motR = Motor(MOTOR_RIGHT)
motL.forward()
motR.backward()
Tools.delay(2000)
motR.setSpeed(20)
motR.forward()
Tools.delay(2000)
robot.exit()
|
|
Execute the simulation program using WebStart
| Execute the simulation program using WebStart |
Gear:
from raspisim import *
#from raspibrick import *

robot = Robot()
gear = Gear()
gear.forward(2000)
robot.exit()
| from raspisim import *
#from raspibrick import *
robot = Robot()
gear = Gear()
gear.setSpeed(60)
gear.rightArc(0.15, 2000)
gear.leftArc(0.15, 3600)
robot.exit()
|
|
Execute the simulation program using WebStart
| Execute the simulation program using WebStart |
Button Control:
from raspisim import *
#from raspibrick import *

robot = Robot()
gear = Gear()
gear.setSpeed(70)
gear.leftArc(0.1)

while not isEscapeHit():
    continue
robot.exit()
|
from raspisim import *
#from raspibrick import * # only remote  mode

robot = Robot()
gear = Gear()

while not isEscapeHit():
    if isUpHit():
        gear.forward()
    elif isDownHit():
        gear.backward()
    elif isLeftHit():
        gear.leftArc(0.1)
    elif isRightHit():
        gear.rightArc(0.1)
    elif isEnterHit():
        gear.stop()
robot.exit()
|
|
Execute the simulation program using WebStart
| Execute the simulation program using WebStart |
Infrared Sensor:
from raspisim import *
#from raspibrick import *

RobotContext.useObstacle("sprites/racetrack.gif",
    250, 250);
RobotContext.setStartPosition(420, 460)

robot = Robot()
gear = Gear()
irL = InfraredSensor(IR_LEFT)
irR = InfraredSensor(IR_RIGHT)

gear.forward()

while not isEscapeHit():
    vL = irL.getValue()
    vR = irR.getValue()
    print vL, vR
    if vL == 1:
        gear.backward(250)
        gear.right(180)
        gear.forward()
    elif vR == 1:
        gear.backward(250)
        gear.left(180)
        gear.forward()
robot.exit()
| from raspisim import *
#from raspibrick import *
RobotContext.useObstacle("sprites/bar0.gif",
250, 100)
RobotContext.useObstacle("sprites/bar0.gif",
250, 400)
RobotContext.useObstacle("sprites/bar1.gif",
100, 250)
RobotContext.useObstacle("sprites/bar1.gif",
400, 250)
RobotContext.setStartPosition(350, 200)
def onActivated(id):
gear.backward(600)
gear.left(550)
gear.forward()
robot = Robot()
ir = InfraredSensor(IR_CENTER,
activated = onActivated)
gear = Gear()
gear.forward()
while not isEscapeHit():
Tools.delay(100)
robot.exit()
|
|
Execute the simulation program using WebStart
| Execute the simulation program using WebStart |
Line Sensor:
from raspisim import *
#from raspibrick import *

RobotContext.useBackground("sprites/circle.gif")

robot = Robot()
gear = Gear()
gear.setSpeed(30)
irL = InfraredSensor(IR_LINE_LEFT)
irR = InfraredSensor(IR_LINE_RIGHT)
gear.forward()
while not isEscapeHit():
    vL = irL.getValue()
    vR = irR.getValue()
    if vL == 0 or vR == 0:
        gear.backward(1200)
        gear.left(550)
        gear.forward()
robot.exit()
|
from raspisim import *
#from raspibrick import *

RobotContext.useBackground("sprites/border.gif")
RobotContext.setStartPosition(250, 490)

robot = Robot()
gear = Gear()
gear.setSpeed(30)
irL = InfraredSensor(IR_LINE_LEFT)
irR = InfraredSensor(IR_LINE_RIGHT)
gear.forward()

while not isEscapeHit():
    vL = irL.getValue()
    vR = irR.getValue()
    if vL == 1 and vR == 0:
        gear.forward()
    elif vL == 1 and vR == 1:
        gear.rightArc(0.1)
    elif vL == 0 and vR == 0:
        gear.leftArc(0.1)
robot.exit()
|
|
Execute the simulation program using WebStart
| Execute the simulation program using WebStart |
Light Sensor:
from raspisim import *
#from raspibrik import *

RobotContext.useTorch(1, 150, 250, 100)
RobotContext.showStatusBar(20)

def showValues(v1, v2):
    RobotContext.setStatusText("Drag torch! \
Light intensity front left: %5d,  \
front right: %5d" %(v1, v2))

robot = Robot()
lsL = LightSensor(LS_FRONT_LEFT)
lsR = LightSensor(LS_FRONT_RIGHT)
while not robot.isEscapeHit():
    vL = lsL.getValue()
    vR = lsR.getValue()
    showValues(vL, vR)
    Tools.delay(100)
robot.exit()
|
from raspisim import *
#from raspibric import *

RobotContext.useTorch(1, 150, 250, 100)

robot = Robot()
gear = Gear()
lsFL = LightSensor(LS_FRONT_LEFT)
lsFR = LightSensor(LS_FRONT_RIGHT)
lsRL = LightSensor(LS_REAR_LEFT)
lsRR = LightSensor(LS_REAR_RIGHT)
gear.setSpeed(25)
gear.forward()
s = 0.02
while not isEscapeHit():
    vFL = lsFL.getValue()
    vFR = lsFR.getValue()
    vRL = lsRL.getValue()
    vRR = lsRR.getValue()
    d = (vFL - vFR) / (vFL + vFR)
    if vRL + vRR > vFL + vFR:  # torch behind robot
        gear.right()
    elif d > -s and d < s:
        gear.forward()
    else:
        if d >= s: # on left side
            gear.leftArc(0.05)
        else:  # on right side
            gear.rightArc(0.05)
robot.exit()
|
|
Execute the simulation program using WebStart
| Execute the simulation program using WebStart |
LEDs:
from raspisim import *
#from raspibrik import *
def turnOn(id):
    Led.clearAll()
    leds[id].setColor("white")

def onButtonEvent(event):
    global isRunning, n
    if event == SharedConstants.BUTTON_PRESSED:
        n  = (n + 1) % 4
        turnOn(n)
    elif event == SharedConstants.BUTTON_LONGPRESSED:
        isRunning = False

robot = Robot(buttonEvent = onButtonEvent)
leds = [0] * 4
for id in range(4):
    leds[id] = Led(id)

leds[0].setColor("green")
n = 0
isRunning = True
while isRunning:
    Tools.delay(100)
Led.setColorAll("red")
Tools.delay(2000)
robot.exit()
|
from raspisim import *
#from raspibrik import *
RobotContext.useTorch(1, 250, 250, 100)
RobotContext.useShadow(50, 150, 450, 200)
RobotContext.useShadow(100, 300, 350, 450)

robot = Robot()
gear = Gear()
ls = LightSensor(LS_FRONT_LEFT)
gear.leftArc(0.5)
isLightOn = False

while not isEscapeHit():
    v = ls.getValue()
    if not isLightOn and v == 0:
        isLightOn = True
        Led.setColorAll(Color.white)
    if isLightOn and v > 0:
        isLightOn = False
        Led.clearAll()
    Tools.delay(100)
robot.exit()
|
|
Execute the simulation program using WebStart
| Execute the simulation program using WebStart |
Camera, Servo Motor:
|
toDo
| toDo |
|
Execute the simulation program using WebStart
| Execute the simulation program using WebStart |
|
|
|
 LinkUp
 TCPCom
 Simulations